Clickpost has a dedicated section for warehouse mapping. This section can be used by your team to map the warehouse with the help of the location id.
This step needs to be done if you have more than one warehouse, with the help of the location id we can identify from which warehouse the order has been created and picked up.
In order to explore the warehouse mapping section, you need to follow the below steps.
Dashboard login(dashboard.clickpost.ai)>>Dispatch>>warehouse Mapping

Following is the screenshot of the default view when you visit Courier Partner Mapping.
https://dashboard.clickpost.ai/orders/warehouse-mapping

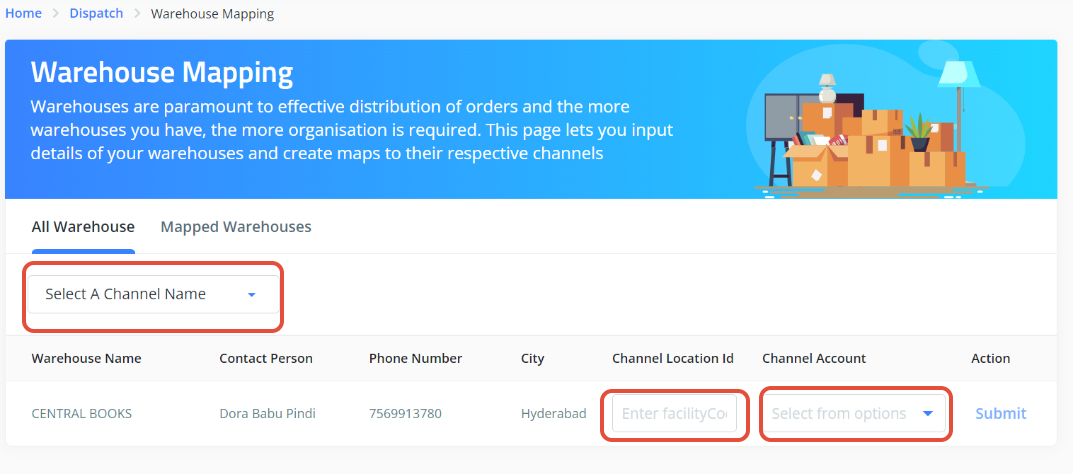
Once you are in the warehouse mapping section and in the "All Warehouse section" you will get an option to "select channel name", in order to map the warehouse you need to enter the channel location id and channel account. Post entering all the correct information you need to click on submit option and the warehouse will be mapped accordingly.
Sharing the snapshot below for reference.
In order to check the Mapped Warehouse in the ClickPost dashboard, you need to visit the Mapped Warehouse section which is beside All Warehouse section. Under the "Mapped Warehouse" section you need to select the correct chanel name and Account accordingly.

Once you have selected the Channel Name and Account then the warehouse details will reflect on the ClickPost dashboard. Under the reflected warehouse details you will also be able to see the location id that was used to map the warehouse and if in case, the entered location id is incorrect then you can edit the same from there itself and submit it.

Was this article helpful?
That’s Great!
Thank you for your feedback
Sorry! We couldn't be helpful
Thank you for your feedback
Feedback sent
We appreciate your effort and will try to fix the article